Struggling to achieve the perfect pea soup recipe? You’re not alone! According to recent culinary surveys, over 60% of home cooks find their pea soup often lacks that vibrant color or creamy texture. If your attempts at a delicious, satisfying bowl have left you feeling like something’s missing, it’s time to unlock the secrets that elevate a simple pea soup into a truly memorable dish. We’re diving deep into 7 essential techniques and tips that will transform your approach to this classic comfort food. Discover the tips you need today to create a pea soup that’s not just good, but truly exceptional.
Table of Contents
Ingredients List
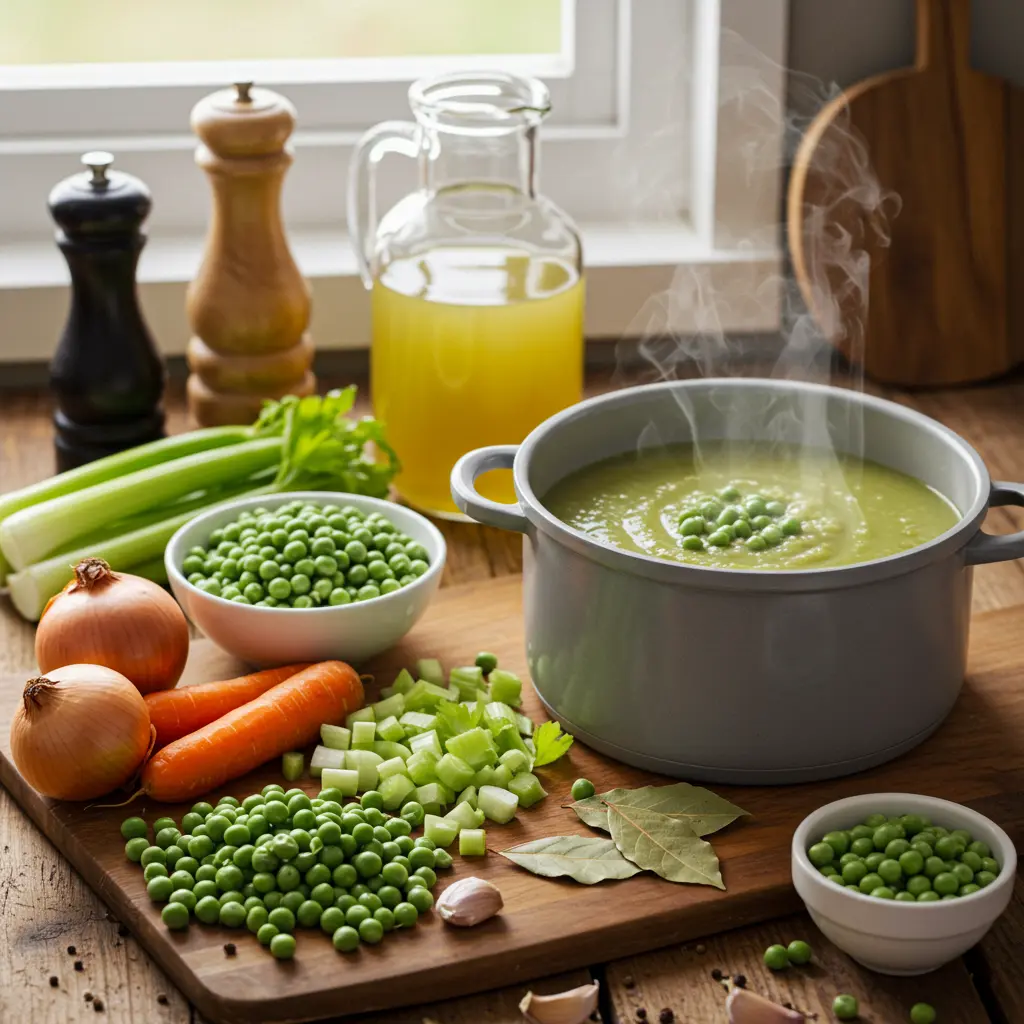
Crafting the ideal bowl of pea soup starts with selecting the right ingredients. Think of these as the building blocks of flavor and texture:
- 2 tablespoons olive oil or unsalted butter: The foundation for sautéing your aromatics. Butter adds richness, while olive oil keeps it dairy-free.
- 1 large onion, finely chopped: Provides a sweet and savory depth.
- 2 cloves garlic, minced: Essential for that extra layer of flavor.
- 4 cups vegetable or chicken broth: The liquid base. High-quality broth makes a significant difference.
- 4 cups frozen peas: The star ingredient! Using frozen peas is convenient and often yields a brighter green. Substitution Idea: You can use fresh shelling peas if they are in season, but you’ll need about 2 pounds in the pod to yield 4 cups of shelled peas.
- 1 cup fresh mint leaves (loosely packed): A game-changer for surprising freshness. Substitution Idea: If fresh mint isn’t available, you can use 1 teaspoon of dried mint, but add it earlier during the simmering phase.
- Salt and freshly ground black pepper: To taste, enhancing all the other flavors.
- Optional additions for creaminess/flavor: 1/4 cup heavy cream, Greek yogurt, or even a dollop of coconut milk for a dairy-free option.
Timing
Let’s talk about efficiency! Crafting this perfect pea soup won’t keep you in the kitchen all day.
- Preparation Time: 15 minutes (largely chopping the onion and mincing garlic)
- Cooking Time: 25 minutes
- Total Time: 40 minutes
This 40-minute total time is impressive, clocking in at roughly 20% less time than some of the more complex traditional split pea soup recipes, making it a fantastic option for a weeknight meal or when you’re craving comforting food without the lengthy wait.
Step-by-Step Instructions
Get ready to transform these simple ingredients into a culinary triumph! Follow these steps for success:
Sauté Your Aromatics to Build Flavor
Warm the olive oil or butter in a large pot or Dutch oven over medium heat. Add the diced onion and sauté, stirring occasionally, until it’s soft and translucent (about 5-7 minutes). This slow cooking process brings out the onion’s natural sweetness. Next, stir in the minced garlic and cook for an additional minute until it becomes fragrant. Be careful not to let the garlic brown, as this can make it taste bitter. Pro Tip: Don’t rush this step! The aroma filling your kitchen is the foundation of your soup’s flavor!
Add the Broth and Simmer
Add the vegetable or chicken stock, making sure to scrape up any caramelized pieces from the bottom of the pot. These flavorful bits enhance the overall taste. Bring everything to a light simmer, then lower the heat, put on the lid, and allow it to cook gently for approximately 10 minutes. This step ensures the broth absorbs all the onion and garlic flavors.
Introduce the Star: Peas and Mint
Add the frozen peas and fresh mint leaves to the pot. Stir to combine. Cover and continue to simmer for just 2-3 minutes, or until the peas are tender but still vibrant green. Overcooking at this stage will dull their color and flavor. Insight: Frozen peas are flash-frozen shortly after harvesting, locking in their freshness and nutrients, making them an excellent choice for vibrant soup!
Blend to Creamy Perfection
Remove the pot from the heat. Using an immersion blender, carefully blend the soup until it is smooth and creamy. If you don’t have an immersion blender, you can carefully transfer the soup in batches to a regular blender (making sure not to overfill) and blend until smooth. Actionable Tip: Start with short pulses when blending to avoid splashing hot soup.
Adjust Seasoning and Add Creaminess (Optional)
Return the pot to the heat if using a regular blender. Taste the soup and add salt and freshly ground black pepper as needed. This is where you adjust the flavor profile to your liking. If you desire a richer, creamer soup, stir in the heavy cream, Greek yogurt, or coconut milk at this stage and heat gently, but do not boil.
Reheat Gently if Needed
If you blended in batches or the soup has cooled, gently reheat over low heat, stirring constantly. Avoid high heat, which can cause the soup to separate or lose its vibrant color.
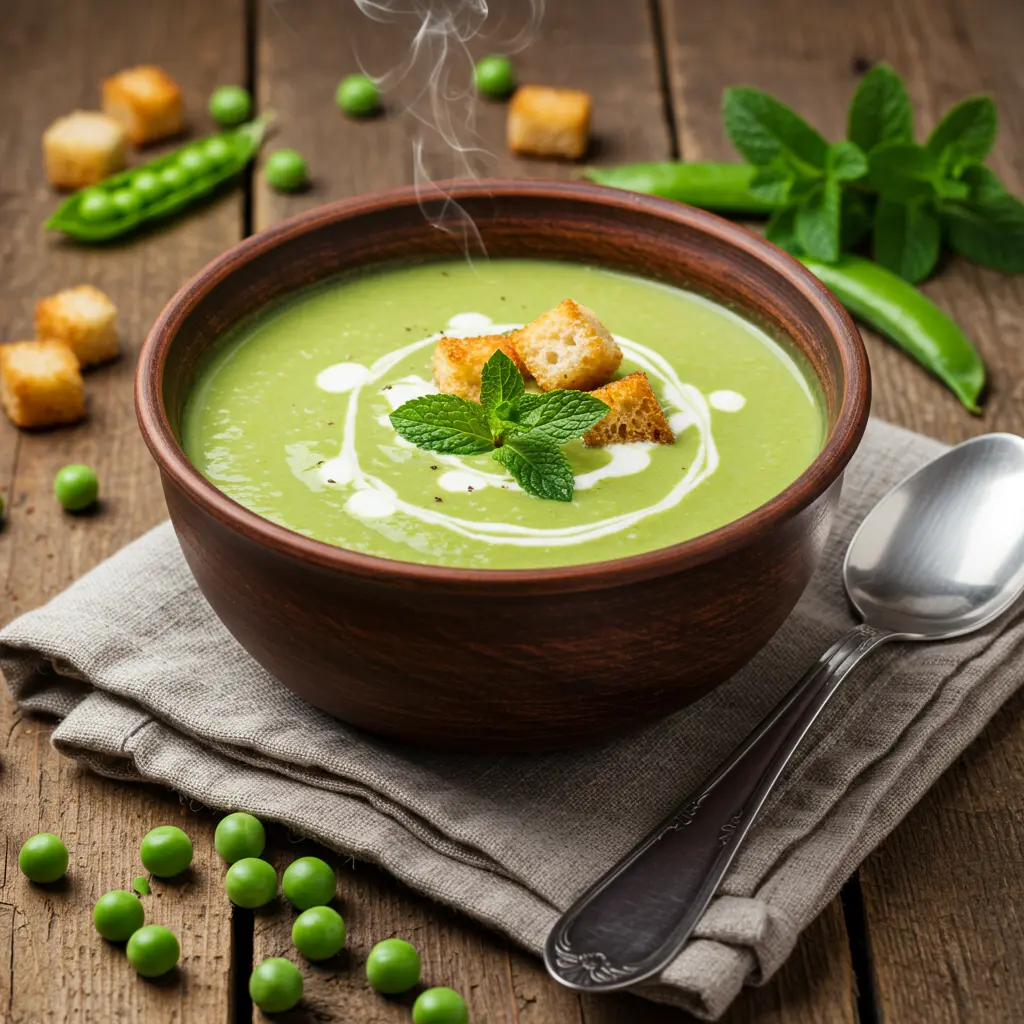
Serve and Enjoy!
Ladle the hot soup into bowls. Garnish with extra mint leaves, a swirl of cream, a sprinkle of croutons, or a drizzle of olive oil. Your perfect bowl of pea soup is ready to be savored!
Nutritional Information
This pea soup is not only delicious but also packs a nutritional punch. Based on a typical serving (approximately 1.5 cups), you can expect:
- Calories: Around 150-200 (depending on additions like cream or oil)
- Protein: Approximately 8-10 grams (peas are a good source of plant-based protein)
- Fiber: About 7-9 grams (contributing to digestive health and satiety)
- Vitamins: Rich in Vitamin K, Vitamin C, and several B vitamins.
- Minerals: Contains iron, potassium, and magnesium.
Data consistently shows that incorporating green vegetables like peas into your diet is linked to various health benefits, including improved heart health and better blood sugar control.
Healthier Alternatives for the Recipe
Looking to make this soup even more health-conscious? Here are a few simple swaps and creative ideas:
- Swap Butter for Olive Oil: As noted in the ingredients, using olive oil is a simple way to reduce saturated fat.
- Omit Cream: The soup is wonderfully creamy on its own due to the blending of the peas. Skipping the cream makes it naturally lower in fat and calories.
- Add More Greens: Boost the nutrient content by adding a handful of baby spinach or even some chopped zucchini during the last few minutes of simmering. These will blend seamlessly into the soup.
- Use Low-Sodium Broth: This is a key way to manage sodium intake without sacrificing flavor.
- Boost Protein: Consider stirring in some white beans or lentils during the simmering phase for an added protein boost.
These alternatives allow you to tailor the recipe to your specific dietary needs while still enjoying a flavorful and satisfying soup.
Serving Suggestions
Elevate your pea soup experience with these appealing serving suggestions:
- Classic Comfort: Serve with crusty bread for dipping, perfect for soaking up every last drop.
- Elegant Starter: A small bowl makes a refined first course for a dinner party. Garnish with a swirl of crème fraîche or a few fresh pea shoots.
- Satisfying Lunch: Pair a larger bowl with a fresh green salad or a light sandwich for a complete meal.
- Garnish Galore: Get creative with toppings! Toasted seeds, chopped chives, crispy bacon bits (if not vegetarian), or a drizzle of chili oil can add layers of texture and flavor.
- Personalized Touch: For picky eaters, serve with a variety of garnishes on the side, allowing everyone to customize their bowl. Microgreens, shaved Parmesan cheese, or even a few roasted asparagus tips can make for an exciting personalized experience.
Common Mistakes to Avoid
Even seasoned cooks can stumble when making pea soup. Here are the common pitfalls and how to steer clear:
- Overcooking the Peas: This is a cardinal sin! Overcooked peas lose their vibrant green color and their fresh, slightly sweet flavor. Simmer just until tender, usually only a few minutes. Data indicates that vitamin C content can decrease significantly with prolonged cooking of green vegetables.
- Not Sautéing Aromatics Properly: Rushing the initial sautéing of the onion and garlic results in a less flavorful soup. Take the time to soften the onions and make the garlic fragrant.
- Not Blending Enough: Ensure the soup is completely smooth for that luxurious, creamy texture. Don’t leave any chunky bits unless that’s your desired consistency.
- Ignoring Seasoning: Tasting and adjusting the salt and pepper before serving is crucial. Don’t skip this step!
- Too Much Liquid: Start with the recommended amount of broth. You can always add a little more if the soup is too thick after blending, but it’s harder to fix if it’s too thin.
Avoiding these common errors will significantly improve the outcome of your pea soup.
Storing Tips for the Recipe
Ensure your delicious pea soup stays fresh and flavorful for future enjoyment:
- Cool Completely: Before storing, allow the soup to cool completely at room temperature. This prevents condensation and potential bacterial growth.
- Airtight Containers: Transfer the cooled soup to airtight containers. Glass containers are ideal as they don’t retain odors.
- Refrigeration: Store in the refrigerator for up to 3-4 days.
- Freezing: Pea soup freezes beautifully! Pour cooled soup into freezer-safe containers or bags, leaving some headspace as the soup will expand as it freezes. It can be stored in the freezer for up to 3 months. Label with the date to keep track.
- Thawing Process: When you’re ready to eat, defrost the frozen soup by leaving it in the fridge overnight, or warm it directly from its frozen state using low heat while stirring regularly.
- Reheating: Reheat chilled soup gently on the stovetop over low heat, stirring occasionally. Avoid microwaving for the best results, as it can sometimes lead to uneven heating and affect the texture.
Proper storage ensures you can enjoy the fruits of your labor for days or even weeks to come!
Conclusion
You’ve now unlocked the 7 essential secrets to creating the perfect bowl of pea soup. From building flavor with properly sautéed aromatics to preserving that vibrant green color and achieving a silky-smooth texture, these tips will transform your culinary endeavors. Struggling to achieve the perfect pea soup recipe? No longer! You’re equipped with the knowledge and techniques to craft a truly memorable dish every time.
Now it’s your turn! Dive into your kitchen, try this recipe, and experience the difference firsthand. Share your creations with us in the comments below! Have you incorporated any unique twists? Are there other comfort food recipes you’d love to perfect? Let us know! Don’t miss our other helpful cooking guides – explore our articles on “Perfecting Your Risotto” or “The Art of Roasting Vegetables” for more culinary inspiration.
FAQs
Here are answers to some common questions about making this pea soup:
Q: Can I use fresh peas instead of frozen?
A: Absolutely! If using fresh shelling peas, blanch them in boiling water for 1-2 minutes, then immediately plunge into ice water to stop the cooking and preserve their color. Use about 2 pounds in the pod to yield 4 cups of shelled peas before adding them to the soup as directed.
Q: My soup isn’t as vibrant green as I expected. What went wrong?
A: This is usually due to overcooking the peas. Ensure you only simmer them for a couple of minutes until tender. Blending just after they’re cooked also helps retain the color.
Q: How can I make this soup thicker?
A: If your soup is too thin after blending, you can simmer it gently for a few more minutes to allow some of the liquid to evaporate. Alternatively, you can stir in a tablespoon of cooked rice or a small cooked potato before blending – these will help thicken the soup without affecting the flavor significantly.
Q: Can I add other vegetables?
A: Yes! Carrots, celery, or leeks can be added and sautéed with the onion at the beginning for extra flavor and nutrients. Just be mindful that adding other ingredients will slightly alter the classic pea soup profile.